Azure Static Web Apps - a Netlify alternative

Jamstack sites have taken the world by storm. There's currently fierce competition between offerings like Netlify and Cloudflare. A new player in this space is Azure Static Web Apps. This post will look at what working with SWAs is like and will demonstrate deploying one using GitHub Actions.
Jamstack and Azure Static Web Apps
Jamstack stands for JavaScript, API and Markup In Jamstack websites, the application logic typically resides on the client side. Typically these clients are built as single-page applications and often have HTML files statically generated for every possible path to support search engine optimization.
Azure Static Web Apps were released for general use in May 2021 and offer features including:
- Globally distributed content for production apps
- Auto-provisioned preview environments
- Custom domain configuration and free SSL certificates
- Built-in access to a variety of authentication providers
- Route-based authorization
- Custom routing
- Integration with serverless APIs powered by Azure Functions
- A custom Visual Studio Code developer extension
Significantly, these features are available to use for free. With Netlify there is also a free tier, however it's quite easy to exceed the build limits of the free tier and land yourself with an unexpected bill. By combining Azure Static Web Apps with GitHub Actions we can build comparable experiences and save ourselves money!
So let's build ourselves a simple SWA and deploy it with GitHub Actions.
Create our application
Inside the root of our repository we're going to create a Docusaurus site. Docusaurus is a good example of a static site, the kind of which is a natural fit for Jamstack. We could equally use something else like Hugo for instance.
At the command line we'll enter:
npx create-docusaurus@latest website classic
And Docusaurus will create a new site in the website directory. Let's commit and push this and turn our attention to Azure.
Creating a Static Web App in Azure
There's a number of ways to create a Static Web App in Azure. It's possible to use infrastructure as code with a language like Bicep. But for this post let's use the Azure Portal instead. If you don't have an account already, you can set one up for free very quickly.
Once you've logged in, click "Create a resource" and look up Static Web App:

Click on "Create" and you'll be take to the creation dialog:

You'll need to create a resource group for your SWA to live in, give the app a name, the "Free" plan and a deployment source of GitHub.
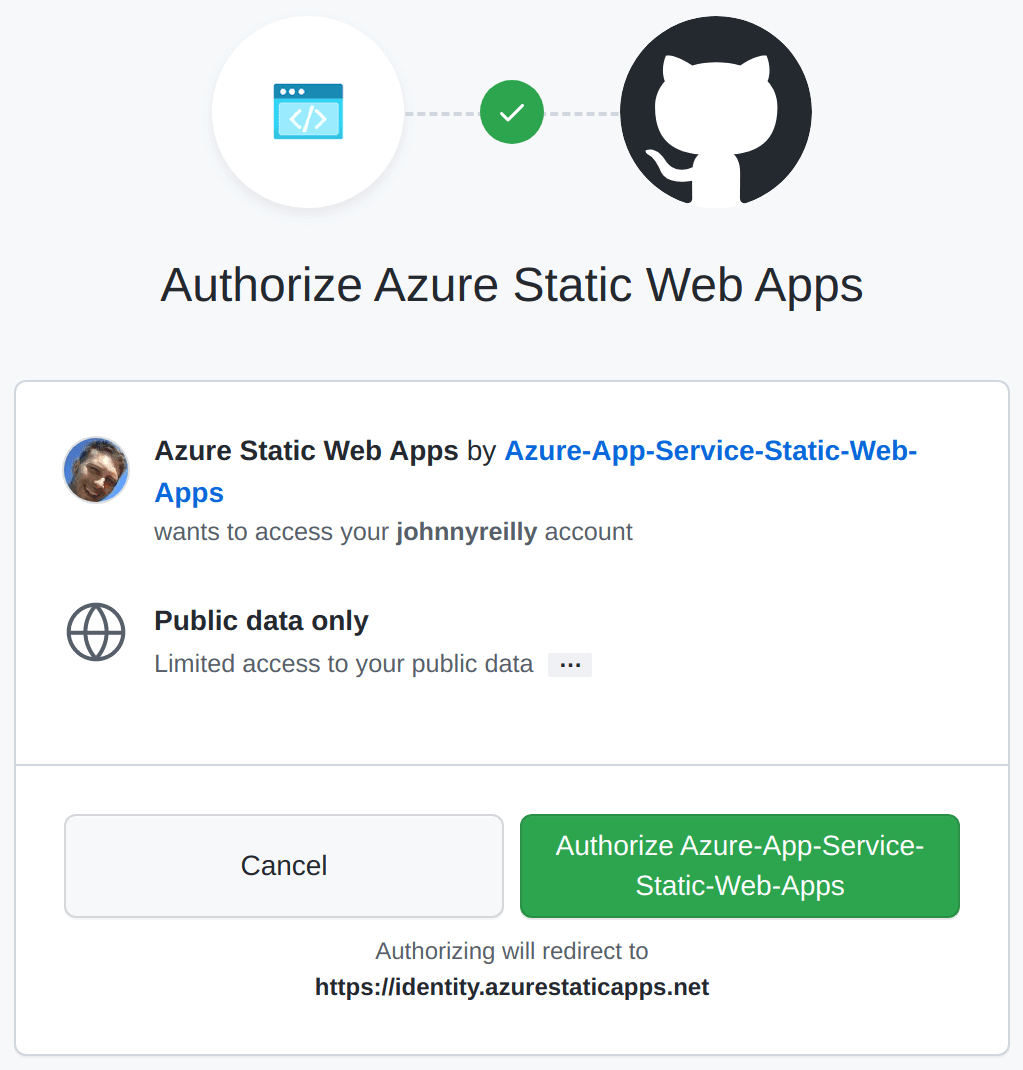
Click on the "Sign in with GitHub" button and authorize Azure to access your GitHub account for Static Web Apps.

At this point Azure will query GitHub on your behalf and look up the organisations and repositories you have access to. Select the repository that you'd like to deploy to your Static Web App and select the branch you'd like to deploy.
You also need to provide Azure with some build details that help it understand how your app is built. We'll provide a preset of "Custom". We'll set the "App location" (the root of our front end app) to be "/website" to tally up with the application we just created. We'll leave "Api location" blank and we'll set the output location to be "build" - this is the directory under website where Docusaurus will create our site.
Finally click "Review + create" and then "Create".
Azure will now:
- Create an Azure Static Web app resource in Azure
- Update your repository to add a GitHub Actions workflow to deploy your static web app
- Kick off a first run of the GitHub Actions workflow to deploy your SWA.
Pretty amazing, right?
When you look at the resource in Azure it will look something like this:

If you click on the GitHub Action runs you'll be presented with your GitHub Action:

And when that finishes running you'll be able to see your deployed Static Web App by clicking on the URL in the Azure Portal:

We've gone from having nothing, to having a brand new website in Azure, shipped via continous deployment in GitHub Actions in a matter of minutes. This is low friction and high value!
Authentication
Now we've done our initial deployment, let's take it a stage further and add authentication.
One of the awesome features of Static Web Apps is the fact that authentication is available straight out of the box. We can pick from GitHub, Azure Active Directory and Twitter as identity providers. Let's roll with GitHub and amend our website/src/pages/index.js to support authentication:
import React, { useState, useEffect } from 'react';
import clsx from 'clsx';
import Layout from '@theme/Layout';
import useDocusaurusContext from '@docusaurus/useDocusaurusContext';
import styles from './index.module.css';

/**
 * @typedef {object} UserInfo
 * @prop {"github"} identityProvider
 * @prop {string} userId
 * @prop {string} userDetails
 * @prop {string[]} userRoles
 */

/**
 * @return {UserInfo | null}
 */
function useUserInfo() {
  const [userInfo, setUserInfo] = useState(null);

  useEffect(() => {
    async function getUserInfo() {
      const response = await fetch('/.auth/me');
      const payload = await response.json();
      const { clientPrincipal } = payload;
      return clientPrincipal;
    }

    getUserInfo().then((ui) => setUserInfo(ui));
  }, []);

  return userInfo;
}

export default function Home() {
  const { siteConfig } = useDocusaurusContext();
  const userInfo = useUserInfo();

  return (
    <Layout
      title={`Hello from ${siteConfig.title}`}
      description="Description will go into a meta tag in <head />"
    >
      <header className={clsx('hero hero--primary', styles.heroBanner)}>
        <div className="container">
          <h1 className="hero__title">{siteConfig.title}</h1>
          <p className="hero__subtitle">{siteConfig.tagline}</p>
          <div className={styles.buttons}>
            {userInfo ? (
              <p>Hello {userInfo.userDetails}</p>
            ) : (
              <a
                className="button button--secondary button--lg"
                href="/.auth/login/github"
              >
                Click here to login
              </a>
            )}
          </div>
        </div>
      </header>
    </Layout>
  );
}
The above code does the following:
- Implements a React hook named
useUserInfowhich calls the/.auth/meendpoint of your SWA. This returnsnullwhen not authenticated, and theUserInfowhen authenticated. - For users who are not authenticated, display a link button which takes people to
/.auth/login/github, thus triggering the GitHub authentication flow. - For users who are authenticated, display the users
userDetails; the GitHub username.
Let's commit and push this and (when our build has finished running) browse to our Static Web App once again:

If we click to login, we're taken through the GitHub authentication flow:
Once you've authorised and granted consent you'll be redirected to your app and see that you're logged in:

If we pop open the devtools of Chrome we'll see what comes back from the /.auth/me endpoint:
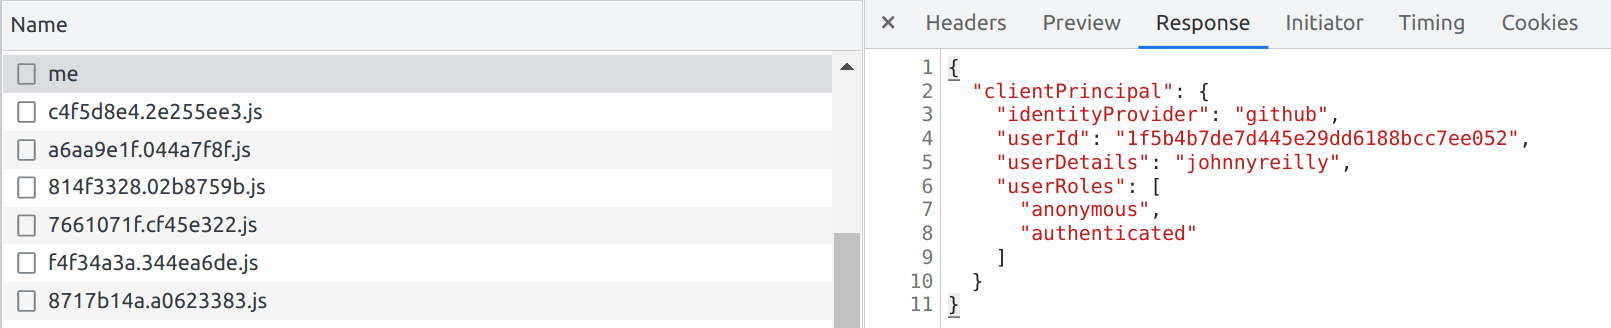
{
  "clientPrincipal": {
    "identityProvider": "github",
    "userId": "1f5b4b7de7d445e29dd6188bcc7ee052",
    "userDetails": "johnnyreilly",
    "userRoles": ["anonymous", "authenticated"]
  }
}
We've now implemented and demonstrated authentication with Azure Static Web Apps with very little effort on our behalf. This is tremendous!
Staging Environments
Finally, let's look at a super cool feature that Static Web Apps provides by default. If you take a look at the Environments tab of your SWA you'll see this:

Staging
Open pull requests against the linked repository to create a staging environment.
Let's try that out! We'll create a new branch:
git checkout -b feat/show-me-staging
In our index.js we'll add an arbitrary piece of text:
<p>I'm a staging environment!</p>
Then we'll commit and push our branch to GitHub and create a pull request. This triggers our GitHub Action to run once again. But this time, rather than publishing over our existing Static Web App, it's going to spin up a brand new one with our changes in. Not only that, it's going to put a link for us in our GitHub pull request so we can browse straight to it:

This is the equivalent of Netlify Deploy Previews, implemented with Azure Static Web Apps and GitHub Actions. Given the allowances for GitHub Actions currently sit at 2,000 free minutes per month as compared with Netlify's 300 free minutes per month, you're less likely to receive a bill for using Static Web Apps.
This staging environment will last only until the pull request is closed. At that point the environment is torn down by the GitHub Action.
Conclusion
In this post we've deployed a website to a Static Web App using GitHub Actions and implemented authentication. We've also demonstrated Azure's equivalent of Netlify's deploy previews; staging environments.